Core Tests
1. Prone Bridge Test

Purpose : To test the core strength of the individual. It also is a good reflection as to the determination of the individual as the body usually has the strength but it is the fight against the pain which is most clearly displayed.
Equipment required : Stop watch
Procedure : The individual lays flat on the stomach with the elbows directly underneath the shoulders and the hands wrapped in with the back of the hands touching the elbows. The feet are spread hip width apart. Align toes under ankles & forearms under shoulders. Keep hips up and back flat. Draw navel into spine then brace core. Keep a straight line posture. The time starts when the body is lifted up onto the toes and a bridge is formed between the arms and toes. The body has to maintain a flat, straight position. Any drop in the hips constitutes a warning. Three warnings and the test is over.
Scoring : The time that the bridge position is held constitutes the score.
Scoring : The time that the bridge position is held constitutes the score.
2. Side Bridge

Purpose: The side bridge test measures the control and endurance of the lateral core stabilizing muscles.
Equipment required: Stopwatch.
Description / procedure: The aim of this test is to hold an elevated position for as long as possible. The subject lays on their right side, the upper body supported off the ground by the right elbow and forearm. The legs are straight, with the left foot (top) in front of your right foot. The hip is lifted off the floor so that the elbow and feet support the body, creating a straight line from head to toe. The left hand is placed on the supporting hip. As soon as the subject is in the correct position, the stopwatch is started. The test is over when the subject is unable to hold the back straight and the hip is lowered. After a short rest, the other side is tested.
Scoring: The score is the total time completed for each side.
3. Abdominal Strength Test - straight leg lift

Purpose: The purpose of this test is to estimate the degree of abdominal strength
Equipment required: Flat surface, an abdominal strength test board with different degrees of angle marked (otherwise, you can use a protractor),
Description / procedure: The subject lays spine on the floor next to the abdominal strength test board. The hip joint should be aligned to the intersection of the scale. The arms are held across the chest and the head rested on the floor. The tester places their finger tips underneath the subject's lower back. Both legs are raised to a 90-dregee angle (vertically) while keeping the upper body flat on the floor. The subject may bend their knees first to move to the starting position, before straightening the knee joint. The subject aims to sustain the pressure on the tester's fingers under the lower back by contracting the abdominals as the legs are lowered. The subject slowly lowers both legs until the pressure on the hand behind the back disappears. The lowest angle observed as the pressure is taken off is the measurement of their abdominal strength.
Scoring: The score is the angle of the legs in degrees from the floor.
Flexibility Tests
4. Sit and Reach Test
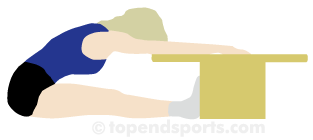
Purpose: This test measures the flexibility of the lower back and hamstring muscles.
Equipment required: Sit and reach box (or alternatively a ruler can be used, and held between the feet)
Description / procedure: This test involves sitting on the floor with legs out straight ahead. Feet (shoes off) are placed with the soles flat against the box, shoulder-width apart. Both knees are held flat against the floor by the tester. With hands on top of each other and palms facing down, the subject reaches forward along the measuring line as far as possible. After three practice reaches, the fourth reach is held for at least two seconds while the distance is recorded. Make sure there is no jerky movements and that the fingertips remain level and the legs flat.
Scoring: The score is recorded to the nearest centimeter as the distance reached by the hand.
Scoring: The score is recorded to the nearest centimeter as the distance reached by the hand.
5. Trunk Rotation Test
 Purpose: The purpose of this flexibility test is to measure trunk and shoulder flexibility, which is important for injury prevention and in particular is important in swimming, racquet sports and throwing sports. It is also a valuable aid in determining any possible muscle imbalances and future back problems.
 Equipment required: A pole about 1.2m in length, trunk rotation mat.
Description / procedure: Stand with feet shoulder width apart with the feet pointing towards the 0 mark. Grasp the pole at the top with the bottom of the pole facing towards the mat. Twist your trunk to your right and the pole should follow along the markings along the floor. You are allowed to turn your shoulders, hips and knees as long as your feet don't move. The score is the angle in degrees to which the pole finishes pointing. Repeat for the left side with your feet in the same position.
Scoring: The score is used to determine whether there are any problems with the child structurally. Rotation results should show similar results on both sides.
6. Shoulder flexibility test

Equipment required: stick or towel, ruler or tape measure.
Description / procedure: Start by holding a towel or a stick in front of the body with both hands wide apart and palms facing downwards. Lift the stick over the head to behind the back, maintaining the hand grip on the object. Repeat the test, moving hands closer together each time until the movement cannot be completed.
Scoring: measure the minimum distance between hands. Measure the distance between the deltoids. Subtract the distance between the deltoids from the distance between the hands to get a score. No norms are currently available for this test.
Note: Arm length must be factored in when comparing children with each other. A child that has grown may also show varying results.
7. Back Bend Test

Purpose : To test the flexibility and strength of the back in a hyper-extended position.
Description/procedure : Lie flat on the stomach with the hands help together behind the back. Lift the upper body up of the floor trying to get the head and chest raised as high as possible. The feet must be kept on the floor throughout the test.
Scoring : Measure the height from the floor to the lower part of the sternum.
Equipment required : Floor mat, ruler or tape measure.
Equipment required : Floor mat, ruler or tape measure.
8. Upper Body - Push-Up Test

Purpose : This test measures upper body strength and mental endurance.
Equipment required: Floor mat
Description / procedure: Start in a push up position - with the hands and toes touching the floor, the body and legs are in a straight line, feet slightly apart, the arms at shoulder width apart, extended and at a right angles to the body. Keeping the back and knees straight, the subject lowers the body until there is a 90-degree angle at the elbows, with the upper arms parallel to the floor. A partner holds their hand at the point of the 90-degree angle so that the subject being tested goes down only until their shoulder touches the partner's hand, then back up. Record the total number of push ups completed in a set time period
Modifications: Girls are allowed to do girls push ups. The position is identical except for the knees which are on the ground. The bum is kept up in the air as the chest is lowered down.
Scoring: Record the number of correctly completed push-ups that were performed in rhythm.
Comments: The subjects should be instructed to spend as little time in the starting position beforehand in order to reduce fatigue and increase the number of repetitions.
Comments: The subjects should be instructed to spend as little time in the starting position beforehand in order to reduce fatigue and increase the number of repetitions.
Leg Strength Tests
9. Wall Squat Test

Equipment Required : Stopwatch
Procedure : Stand with your back toward a wall . The feet should be placed about shoulder-width apart. The hands can be placed on the hips for balancing purpose. Bend your knees, keeping your core muscles tight. Lower your body so that your thighs are just parallel to the floor (ninety-degree angle at the knee joint). Hold the position for as long as possible.
Scoring : Time held with legs parallel to the ground.
10. One Legged Squat Test

Equipment required : Height chart with cm increments
Procedure : The individual starts by standing on one leg with the back of the foot close to the base of your height chart. The other leg is straightened out in front. By flexing the knee the bottom is taken slowly and controlled down as far the leg can go. Failure is deemed when the person can longer control either the descent or ascent. The leg which is up must be kept straight and off the ground at all times. Any touch to the ground is disqualification.
Scoring : A reading is taken from the floor to the inner bone on the inside of the knee. Then a reading is taken at the lowest position to which the bum is seen to stop at. The difference between the two qualifies as the score. The ideal movement would be to lower until the back of the leg presses into the calf completely.
11. Vertical Jump Test

Equipment required: measure tape, or marked wall, chalk for marking.
Procedure : The child stands side on to a wall and reaches up with the hand closest to the wall. Keeping the feet flat on the ground, the point of the fingertips is marked or recorded. This is called the standing reach height. The athlete then stands away from the wall, and leaps vertically as high as possible using both arms and legs to assist in projecting the body upwards. The jumping technique can or cannot use a countermovement. Attempt to touch the wall at the highest point of the jump. The best of three attempts is recorded.
Scoring: The difference in distance between the standing reach height and the jump height is the score
12. The Bleep Test
The current standard for fitness testing
Purpose: To determine the fitness of the child
Equipment required : Beacons spaced at 20m intervals, CD player with Bleep test instruction.
Procedure : The child runs between the beacons keeping to the rhythm of the CD. Each bleep gets faster than the previous one. The child is required to keep pace with the bleeps whilst still crossing the line each side.
Scoring : The score is the number of laps completed before being bleeped out. One warning is issued.